
Impresoras de inyección de tinta limpiador de cabezal de impresora para WF-7720 WF-7710 WF-7610 WF-7620 WF-7110 WF-2660 WF-2630 WF-2760 WF-2750 WF-3640 WF-3620 WF-2650 XP-430 XP-330 XP-420 XP-410 XP-220 XP-320-3.4oz Kit de limpieza
- Product Code: 1569395411-2466
- Availability: In Stock
-
$ 1,000,000.00
***** CONDICIONES PARA LA VENTA *****
1.- Tiempo de entrega de 3 a 5 días Hábiles.
2.- Enviamos su compra a cualquier parte del país.
.
.
***** TITULO COMPLETO *****
.
Impresoras de inyección de tinta limpiador de cabezal de impresora para WF-7720 WF-7710 WF-7610 WF-7620 WF-7110 WF-2660 WF-2630 WF-2760 WF-2750 WF-3640 WF-3620 WF-2650 XP-430 XP-330 XP-420 XP-410 XP-220 XP-320-3.4oz Kit de limpieza.
***** DESCRIPCIÓN DEL PRODUCTO *****
.
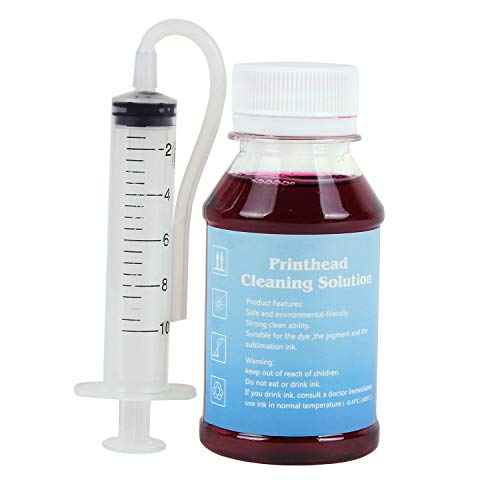
Esto se ajusta a tu . Asegúrate de que esto coincide al ingresar tu número de modelo. Para resolver el mal de impresión (véase las tiras de patrón muestra en vertical, horizontal o rayas en blanco de impresión), que fue causado por satura cabezal de impresión. Incluye la enzima activa, máxima limpieza, el componente es seguro y la protección del medio ambiente, que no se oxida el cabezal de impresión. Tasa de éxito llegar al 90% No es necesario desmontar el cabezal de impresión, operación fácil. Para el uso con tinte, pigmento y tinta de sublimación. . Descripción del producto Directions: 1. Heat the cleaning fluid. 2. Print the "nozzle checking" test page to confirm the color to be cleaned. 3. Pick out the ink cartridge. 4. Inject the cleaning fluid into the print head that needs cleaning with a syringe. 5. Install the ink cartridges and run the "nozzle cleaning" function twice in printer driver. Package content: 3.4 oz Print head Cleaning Fluid 1 × Syringe(10 ML) 1 × silicone tube 1 × instruction manual Risk Warning: 1. After finishing cleaning with this fluid, you need to use the printer's cleaning program for printhead cleaning, which will consume a lot of ink. So if you only have a little bit ink left, you may need to purchase a new ink cartridge. 2. Since there are several causes for printer blockage. This cleaning fluid does not ensure that all blockages will be solved. Such as: (1) The printhead blockage is very serious or there is insoluble substances in the nozzle, this cleaning fluid might not work. (2) The printhead is aging, the blockage situation might get worse after cleaning. 3. Since you are not a professional, there is a risk of damaging the printer when repair it by yourself, such as: when you inject the fluidinto the printhead, if there is leakage or improper operation, it will cause a short-circuit, which will lead to the circuit board burned, even the printer damaged completely. Although there are the above risks, most customers can clean the printhead successfully under our guidance. After reading this tip, you can decide whether this cleaning solution is worth trying according to your own situation. If you have any other questions, you can contact our seller, we will give you professional guidance. 1. First, you can print a nozzle check pattern to check for clogged nozzles. There are gaps in the black lines for example. 2. Use the microwave oven to heat the water in the glass to 130?-140?(not exceed 140?, otherwise will be deformed), and then put the cleaning fluid bottle in the hot water to heat up. 3. Select "Replace Ink Cartridge" and wait for the carriage unit to move the location of the ink replacement, remove it and unplug the power cable directly, then push the carriage unit to the right side of the printer. 4. Get a kitchen towel or blotting paper(strong water absorption and 2-3 layers), cut into a 4 CM wide strip shape, and put it in the printer. Step 1 Step 2 Step 3 Step 4 5. Push the carriage unit to the middle of the printer. Let it be above of the paper. 6. Insert the syringe into the silicone tube and inhale 4 ml of the heated cleaning fluid. 7. According to step 1, insert the silicone tube into the ink inlet of the color which needs to be cleaned, and push the handle slowly of the syringe to inject the cleaning liquid into the print head. 8. Leave the fluid inside for 1 hour to dissolve the blockage inside the print head. Repeat step 6 and 7, and cleaning again. Step 5 Step 6 Step 7 Step 8 9. Repeat step 6 and 7, inject 4 ml cleaning fluid to rinse the print head again. 10. Clean up the residual cleaning fluid inside, and then push the carriage unit back to the right side of the printer, pick out the paper. 11. Connect the power cable, start the printer, and install the cartridges. Select in the printer driver to press "Maintenance" -> "Print Head Cleaning" to start the cleaning cycle, and then print the "Printer Test Page" to confirm if the print head works well. 12. If it still doesn’t work, you can try it again. Extend the waiting time in Step 8, and if you still don't see any effect after cleaning the print head 2 times, it is recommended to try again after one day. Step 9 Step 10 Step 11 Step 12 Cautions: After cleaning, if the clogging is more serious, maybe it's because the cleaning liquid hasn’t been totally discharged and still stays inside the print head. Please follow the following steps: 1. If you have the refill ink for this printer, you can inhale ink 4 ML with a syringe and inject it into the ink inlet of the print head, then install the cartridge and run the driver's "Print head cleaning" function 1 times. 2. If you do not have the refill ink for this printer, you can use an empty syringe (do not need to inhale anything)to connect with the ink inlet of the print head, repeatedly push and pull the plunger of the syringe to discharge the cleaning liquid. Then install the ink cartridge, and run the driver "print head cleaning" function 1 times. 3. If there is no improvement, you will need to wait 2 hours and try again to run the driver's "Print head cleaning" function 1 times. The above methods can be tried several times. Leer más . null . Información de producto Color:A1 Especificaciones técnicas Marca CoYlBod Peso del producto 0.8 onzas Dimensiones del paquete 4.9 x 2.6 x 2.4 pulgadas Número de modelo del producto 8541628141 Color A1 Número de pieza del fabricante EPXY0003 Información adicional ASIN B071JK8CH7 Opinión media de los clientes 4.0 de 5 estrellas 275 calificaciones 4.0 de 5 estrellas Clasificación en los más vendidos de nº3,132 en Productos de Oficina (Ver el Top 100 en Productos de Oficina) nº310 en Cartuchos de Tinta Peso del envío 0.8 onzas (Ver tarifas y políticas de envío) Producto en desde junio 4, 2017 Comentarios Si vendes este producto, ¿te gustaría sugerir actualizaciones mediante el soporte al vendedor? ¿Quieres informarnos sobre un precio más bajo? . null


1.- Tiempo de entrega de 3 a 5 días Hábiles.
2.- Enviamos su compra a cualquier parte del país.
.
.
***** TITULO COMPLETO *****
.
Impresoras de inyección de tinta limpiador de cabezal de impresora para WF-7720 WF-7710 WF-7610 WF-7620 WF-7110 WF-2660 WF-2630 WF-2760 WF-2750 WF-3640 WF-3620 WF-2650 XP-430 XP-330 XP-420 XP-410 XP-220 XP-320-3.4oz Kit de limpieza.
***** DESCRIPCIÓN DEL PRODUCTO *****
.
Esto se ajusta a tu . Asegúrate de que esto coincide al ingresar tu número de modelo. Para resolver el mal de impresión (véase las tiras de patrón muestra en vertical, horizontal o rayas en blanco de impresión), que fue causado por satura cabezal de impresión. Incluye la enzima activa, máxima limpieza, el componente es seguro y la protección del medio ambiente, que no se oxida el cabezal de impresión. Tasa de éxito llegar al 90% No es necesario desmontar el cabezal de impresión, operación fácil. Para el uso con tinte, pigmento y tinta de sublimación. . Descripción del producto Directions: 1. Heat the cleaning fluid. 2. Print the "nozzle checking" test page to confirm the color to be cleaned. 3. Pick out the ink cartridge. 4. Inject the cleaning fluid into the print head that needs cleaning with a syringe. 5. Install the ink cartridges and run the "nozzle cleaning" function twice in printer driver. Package content: 3.4 oz Print head Cleaning Fluid 1 × Syringe(10 ML) 1 × silicone tube 1 × instruction manual Risk Warning: 1. After finishing cleaning with this fluid, you need to use the printer's cleaning program for printhead cleaning, which will consume a lot of ink. So if you only have a little bit ink left, you may need to purchase a new ink cartridge. 2. Since there are several causes for printer blockage. This cleaning fluid does not ensure that all blockages will be solved. Such as: (1) The printhead blockage is very serious or there is insoluble substances in the nozzle, this cleaning fluid might not work. (2) The printhead is aging, the blockage situation might get worse after cleaning. 3. Since you are not a professional, there is a risk of damaging the printer when repair it by yourself, such as: when you inject the fluidinto the printhead, if there is leakage or improper operation, it will cause a short-circuit, which will lead to the circuit board burned, even the printer damaged completely. Although there are the above risks, most customers can clean the printhead successfully under our guidance. After reading this tip, you can decide whether this cleaning solution is worth trying according to your own situation. If you have any other questions, you can contact our seller, we will give you professional guidance. 1. First, you can print a nozzle check pattern to check for clogged nozzles. There are gaps in the black lines for example. 2. Use the microwave oven to heat the water in the glass to 130?-140?(not exceed 140?, otherwise will be deformed), and then put the cleaning fluid bottle in the hot water to heat up. 3. Select "Replace Ink Cartridge" and wait for the carriage unit to move the location of the ink replacement, remove it and unplug the power cable directly, then push the carriage unit to the right side of the printer. 4. Get a kitchen towel or blotting paper(strong water absorption and 2-3 layers), cut into a 4 CM wide strip shape, and put it in the printer. Step 1 Step 2 Step 3 Step 4 5. Push the carriage unit to the middle of the printer. Let it be above of the paper. 6. Insert the syringe into the silicone tube and inhale 4 ml of the heated cleaning fluid. 7. According to step 1, insert the silicone tube into the ink inlet of the color which needs to be cleaned, and push the handle slowly of the syringe to inject the cleaning liquid into the print head. 8. Leave the fluid inside for 1 hour to dissolve the blockage inside the print head. Repeat step 6 and 7, and cleaning again. Step 5 Step 6 Step 7 Step 8 9. Repeat step 6 and 7, inject 4 ml cleaning fluid to rinse the print head again. 10. Clean up the residual cleaning fluid inside, and then push the carriage unit back to the right side of the printer, pick out the paper. 11. Connect the power cable, start the printer, and install the cartridges. Select in the printer driver to press "Maintenance" -> "Print Head Cleaning" to start the cleaning cycle, and then print the "Printer Test Page" to confirm if the print head works well. 12. If it still doesn’t work, you can try it again. Extend the waiting time in Step 8, and if you still don't see any effect after cleaning the print head 2 times, it is recommended to try again after one day. Step 9 Step 10 Step 11 Step 12 Cautions: After cleaning, if the clogging is more serious, maybe it's because the cleaning liquid hasn’t been totally discharged and still stays inside the print head. Please follow the following steps: 1. If you have the refill ink for this printer, you can inhale ink 4 ML with a syringe and inject it into the ink inlet of the print head, then install the cartridge and run the driver's "Print head cleaning" function 1 times. 2. If you do not have the refill ink for this printer, you can use an empty syringe (do not need to inhale anything)to connect with the ink inlet of the print head, repeatedly push and pull the plunger of the syringe to discharge the cleaning liquid. Then install the ink cartridge, and run the driver "print head cleaning" function 1 times. 3. If there is no improvement, you will need to wait 2 hours and try again to run the driver's "Print head cleaning" function 1 times. The above methods can be tried several times. Leer más . null . Información de producto Color:A1 Especificaciones técnicas Marca CoYlBod Peso del producto 0.8 onzas Dimensiones del paquete 4.9 x 2.6 x 2.4 pulgadas Número de modelo del producto 8541628141 Color A1 Número de pieza del fabricante EPXY0003 Información adicional ASIN B071JK8CH7 Opinión media de los clientes 4.0 de 5 estrellas 275 calificaciones 4.0 de 5 estrellas Clasificación en los más vendidos de nº3,132 en Productos de Oficina (Ver el Top 100 en Productos de Oficina) nº310 en Cartuchos de Tinta Peso del envío 0.8 onzas (Ver tarifas y políticas de envío) Producto en desde junio 4, 2017 Comentarios Si vendes este producto, ¿te gustaría sugerir actualizaciones mediante el soporte al vendedor? ¿Quieres informarnos sobre un precio más bajo? . null